How I built a Claude MCP connector that's actually good

Picture this: You run a SaaS app. A customer needs to pull up their latest project, update a couple of fields, and generate a summary to send to their team.
They don’t open your app.
They don’t even remember your app has a dashboard. They just ask their AI agent: “Grab my project from [your product] and update the deadline to Friday.”
The agent handled it. Your product did the work, and your UI never loaded.
That’s the future we’re moving toward (and maybe the future that’s already here). People are starting to work inside a single conversation with a personal agent (think Claude Cowork), directing their agents to access tools and websites on their behalf.
Which creates a problem (and opportunity) for builders. If your product isn’t accessible by AI agents like Claude Cowork, it’ll become invisible to the new way we interact the our digital world. Meaning no one will use it. Meaning you’re sunk.
But there’s a fix. An easy first step toward letting your users interface with your product via agents. Which, for the time-being, can give you a competitive advantage (if you do it right).
The fix is a Claude MCP connector: a small web server that exposes your product’s data and actions as “tools” Claude can call, so a user can read, create, and update things in your product without ever leaving their chat.
I built one for Flyletter, and setting up the foundation was the easy part. That you can do with a little direction from Claude.
The architectural decisions built on that foundation, however, are what separate a good connector from a bad one. These are the decisions Claude will overlook. I know because I had to overcome each obstacle, one-by-one.
So I’m going to walk you through the full Flyletter build and exactly how to create your own Claude MCP connector for your SaaS app, including the parts most tutorials skip.
Part 1: Scaffold the Server and Get a Public URL
The first thing you need to do is create an MCP server folder in your project files.
Open Claude Code and paste this:
Scaffold a TypeScript MCP server using @modelcontextprotocol/sdk with a streamable HTTP transport on Express. Requirements: set package.json to “type”: “module”; set tsconfig.json to “module”: “Node16” and “moduleResolution”: “Node16” (the SDK is ESM-only and other settings break imports). Create src/index.ts with an Express app, a single stateless POST /mcp endpoint that creates a fresh McpServer and StreamableHTTPServerTransport per request and closes both when the response ends, and a GET /health returning {status:”ok”}. Add a registerTools(server) function I will add tools to. Add “build” (tsc) and “start” (node dist/index.js) scripts. Install @modelcontextprotocol/sdk, zod, express, and dev deps typescript, @types/node, @types/express. Then run the build and confirm it compiles.
That gives you a Node server with the MCP SDK wired up, an endpoint Claude can hit, and a placeholder tool so you can confirm it’s alive. Push it to your Git repo so the new folder is picked up in production
Next is to connect it to a public MCP server URL. Railway is the fastest path getting there without any DevOps overhead. It’s also my recommendation when building web apps with Claude Code.
Do this in the Railway dashboard:
-
Create a new project.
-
Connect your Git repo.
-
Set your environment variables (empty for now, you’ll fill these in during auth).
-
Hit deploy.
(Railway detects Node automatically, no config file required.)
When the deploy finishes, Railway assigns your project a public URL in your Settings > Public Networking.
Something like my-mcp-server-production.up.railway.app. That’s your connector URL, and you’ll use it for the rest of this build.
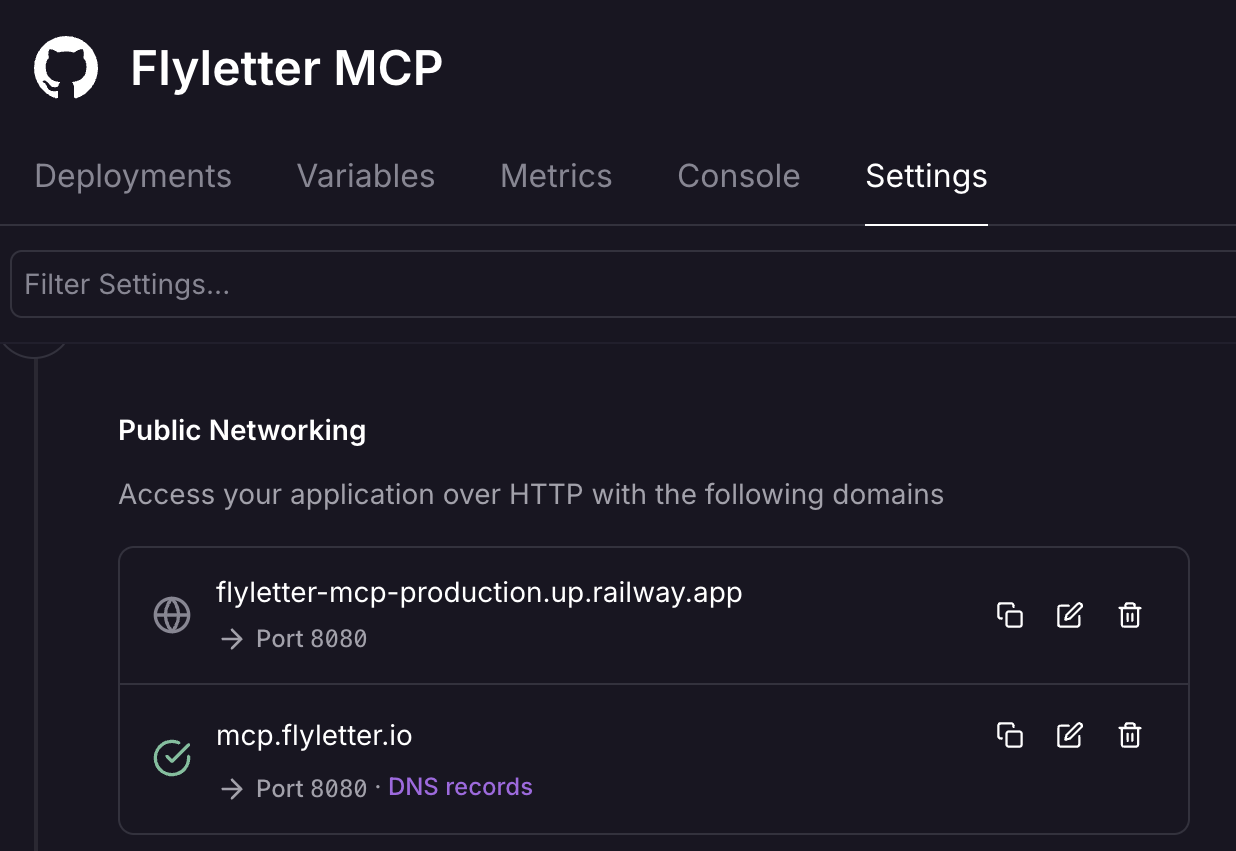
You now have a running server with a public URL. But it’s not useful yet. The next two sections will make it so.
Part 2: Set Up Auth and Clerk Integration
Flyletter uses Clerk for its user login, which also handles the logins for the Flyletter MCP connector to ensure users are logging into their correct accounts. If you don’t have OAuth set up for your SaaS app yet, I recommend you go with Clerk. If you have something else, you can likely set it up in much the same way.
Do this in the Clerk dashboard:
-
Create a new application.
-
Set up an OAuth application inside it.
-
Grab your Clerk keys and add them to your Railway environment variables.
Straightforward so far. But there’s one setting that isn’t on by default, and it’s the one that matters.
Claude’s MCP client registers itself dynamically when it connects. Clerk blocks that by default. So you have to turn on Dynamic Client Registration.
In the Clerk dashboard, go to your OAuth application settings and enable Dynamic Client Registration.
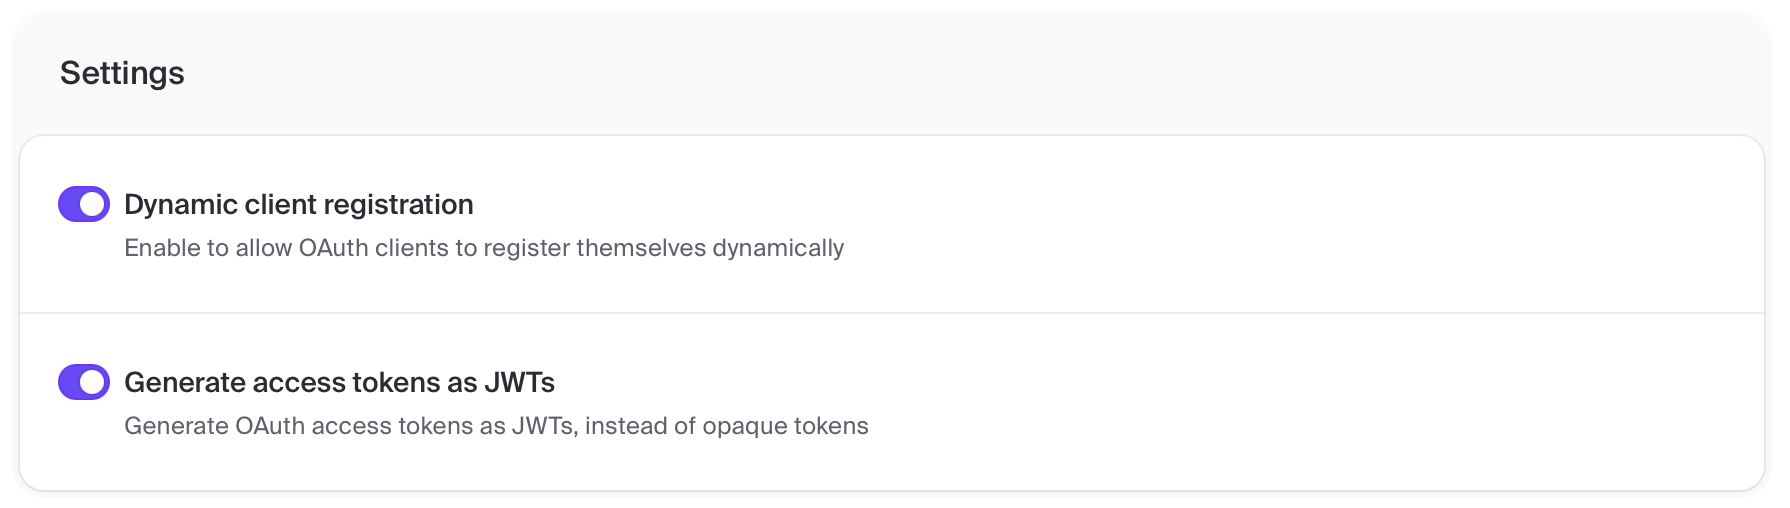
The reason this one hurts is that it fails silently. No error message. No stack trace. Claude just doesn’t connect, and there’s nothing obvious pointing you to the cause. You’ll check your keys, check your URL, check your deploy logs, and find nothing wrong. Because nothing is wrong. Except the toggle. Fuckin’ toggle, amirite?
With Dynamic Client Registration on, Claude can authenticate on behalf of any user who authorizes it. And the token Claude gets back is user-specific, meaning users can log into their account through your Claude connector.
Then, give Claude Code this prompt to wire it all up:
Add Clerk OAuth to this MCP server using @clerk/mcp-tools and @clerk/express. Install both. In index.ts: add clerkMiddleware() and express.json(); wrap the POST /mcp route with mcpAuthClerk so requests are authenticated; add the discovery routes GET /.well-known/oauth-protected-resource/mcp using protectedResourceHandlerClerk({scopes_supported:[”email”,”profile”]}) and GET /.well-known/oauth-authorization-server using authServerMetadataHandlerClerk; add cors with exposedHeaders [”WWW-Authenticate”]. In each tool handler, read the authenticated user id from authInfo.extra.userId and use it to scope data. Read Clerk’s env vars from process.env. Then confirm it builds.
With auth in place, you can start exposing tools. Start with read-access. They’re more forgiving than write-access, but we’ll get there.
Part 3: Create Your Read Tools
Read tools let Claude read user-specific data and information in your product database. They essentially have one job: return the right data to the right user.
It helps answer requests like, “pull last month’s sales numbers,” and Claude can fetch it from Salesforce or whatever. For Flyletter, it fetches a user’s brand voice profile so it can write like them.
Read tools are easy to set up, but equally easy to screw up. Leak one user’s data to another user and you’ve got a real problem.
To prevent this, there are three design rules that keep your tools from breaking in production:
Design rule 1: Ownership gate. Every query filters by the authenticated user’s ID, not just the requested resource ID. If Claude asks for record 47, you don’t just fetch record 47. You fetch record 47 where the owner matches the authenticated user. Without this, anyone can ask for any record.
Design rule 2: Size guard. Cap your list results. Twenty items is a sane default. Return a thousand rows and Claude either times out or blows through its token budget trying to read them. A hard cap keeps every list call fast and predictable.
Design rule 3: Clean schema. Return only the fields Claude needs, not the full database row. Claude reasons better over five clean fields than over forty columns of internal timestamps and foreign keys. Noise in, noise out.
Skip any of these and you’ll ship something that works in testing and breaks in production.
Read tools follow a two-part pattern: At least one list tool, and one or more detail tools beneath it. A list tool is a list of capabilities that Claude can read from. A detail tool is a specific capability within that list of tools.
For Flyletter, get_brand_personas is the list, get_brand_voice is a detail tool because it lives within the brand persona.

Simply tell Claude the tools you want to add to your MCP server and have it write a prompt to give to Claude Code to implement.
Part 4: Create Your Write Tools
Write tools are capabilities that let Claude actually change stuff in your app’s user accounts. Things like taking actions, adding data, etc, on behalf of the user. That’s why it’s important to be careful here.
If a read tool retrieves the wrong data, it’s not the end of the world. If a write tool deletes the wrong user record, it can be disastrous.
So write tools carry three additional design rules that read tools never have to worry about.
Design rule 1: Validation. Check the inputs before you touch the database. If the title is empty or the status is invalid, return a clear error and stop. Never let a malformed write reach your data layer.
Design rule 2: Idempotency. Design writes so duplicate calls don’t produce duplicate effects. Use a unique key or a state check so that if the same write fires twice, the second one is a no-op instead of a second record.
(Yes, idempotency sounds like a made-up nerd word. It just means: if Claude calls this twice by accident, nothing breaks twice.)
Design rule 3: Confirmation schema. Return a structured confirmation object, not a vague “done.” Tell Claude exactly what changed, the record ID, the new values, so Claude can report back to the user accurately instead of guessing.
Work with Claude to create the prompt based on the write capabilities you want, and paste it into Claude Code:
Start with low-stakes writes. Create and update first. Hold off on exposing deletes until the rest is solid, because deletes need an extra confirmation layer before you let an agent near them.
With Flyletter, I only have one write tool, save_idea, which lets you save newsletter ideas from a Claude chat to Flyletter but doesn’t overwrite or delete anything, so it’s relatively safe.

Your connector now reads and writes. Here’s the problem: the output it returns is probably mediocre. And that matters more than you’d think.
Part 5: Set Up Your Kit Orchestration Layer
When Claude calls a raw tool, it gets back a blob of information. The quality of what your user sees depends entirely on how Claude interprets that blob, not on your product’s logic. You built your product to be smart, and then you handed Claude a pile of fields and hoped it would connect them the way your product does. It usually doesn’t.
The obvious fix is to send Claude everything it asks for pre-assembled and richly formatted. Big context, beautifully structured, ready to go. Except now Claude reads that large payload on every single call.
The insight is this: Your MCP connector’s job is assembly, not narration.
The pattern is a single get_kit tool. It calls an internal assembly endpoint, that endpoint queries and assembles all the relevant data into one structured context object, and Claude reasons over the finished object. There are three build steps.
First, the assembly endpoint. Paste this into Claude Code:
Add an internal HTTP endpoint to the server that assembles a full context object for a given user. It should query all the relevant records for that user, combine them into a single structured object with clear sections and computed fields, and return it. This endpoint is internal and will be called by a tool, not by Claude directly.
Second, protect that endpoint by adding a shared secret. Set it as an environment variable in the Railway MCP server, and have the endpoint reject any request that doesn’t send the correct secret in its header. Then paste this into Claude Code:
Protect the internal assembly endpoint with a shared secret. Read the secret from an environment variable, require it in a request header, and reject any request that does not include the correct value with a 401.
Third, the kit tool that ties it together:
Add a get_kit tool to the MCP server. It calls the internal assembly endpoint, passing the shared secret in the header and the authenticated user’s ID, receives the assembled context object, and returns that structured object to Claude.
Why this works: Claude gets a rich, pre-assembled context, but your connector isn’t paying per-token for Claude to assemble it. The quality lives in your product logic. The cost stays flat no matter how many times the tool gets called.
The full stack is built. Before you ship, run through this checklist, because one missed step and the connector fails silently.
Part 6: Launch and Test
With your MCP connector built, the last step is to connect it to Claude and test it.
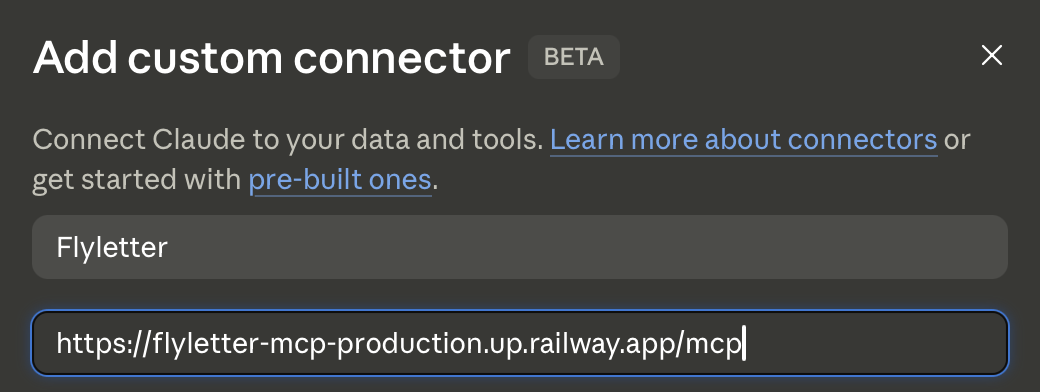
Go to Claude > Customize > Connectors and add a custom connector. Name it your app’s name, and then paste the MCP URL you generated in your Railway server. Something like my-mcp-server-production.up.railway.app.
When connecting it to Claude, make sure you add an additional “/mcp” at the end of the URL. You can check out Flyletter’s below.
From there, click “Add,” and Clerk will prompt you to log into your user account. This is the same way each of your users will access the custom MCP connectors, so you will need to provide them with the MCP URL (same one for everyone) and login instructions.
The Bottom Line
The MCP foundation is the easy part. Anyone can paste a prompt and get a Node server on Railway in ten minutes. What you build on top of it is the harder thing: a connector people actually rely on instead of one they try once and quietly abandon.
Go ahead and build the read-only version of your MCP this week, ownership gate and size guard included. Connect it to Claude, and watch a query come back scoped to exactly one user’s data.
Because the future isn’t hypothetical. It’s here. And this is how you stay ahead.

Writer, founder, and AI builder. Currently building Flyletter, previously sold Selling Signals (100k subscribers). 1 sold, 2 failed, 1 active. This post started as an issue of my weekly newsletter.